¶ Locations Tab
The following sections describe the Locations tab in the Navigine Indoor Location Services CMS. The tab contains all your locations, sub-locations, and maps. You can modify locations via Navigine tools available at the Locations tab.
The rest of this section describes the tools and basic usage guidelines for the Locations tab.
Always remember to click the Save button once you finish making changes in the Locations tab. If you don't save the location, you want be able to download the map with the Demo application.
¶ Add Location
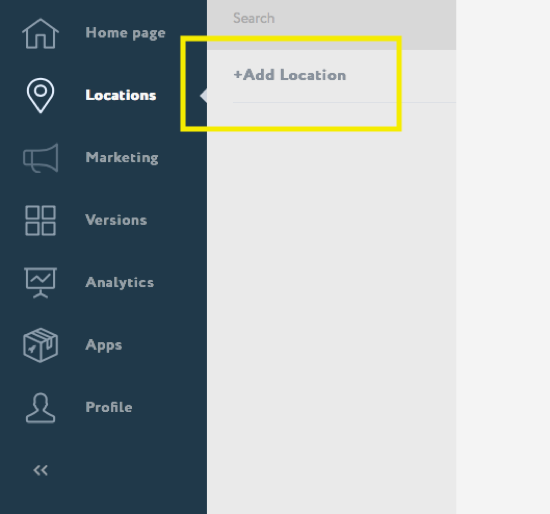
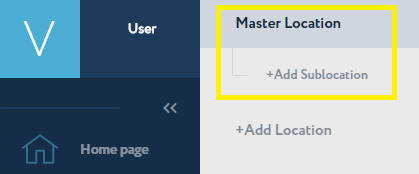
Before you can access any of the Navigine tools available at the Locations tab, you need to create a location. Location is the master project for your indoor location service. Locations consist of sub-locations. The amount of sublocations depends on the complexity of the target location (several floors, several buildings, etc.).
To create a location,
Click +Add Location in the middle frame of the Locations tab. In case when several locations exist, you will see them in the middle frame also, while the +Add Location button will be available in the bottom of the list.
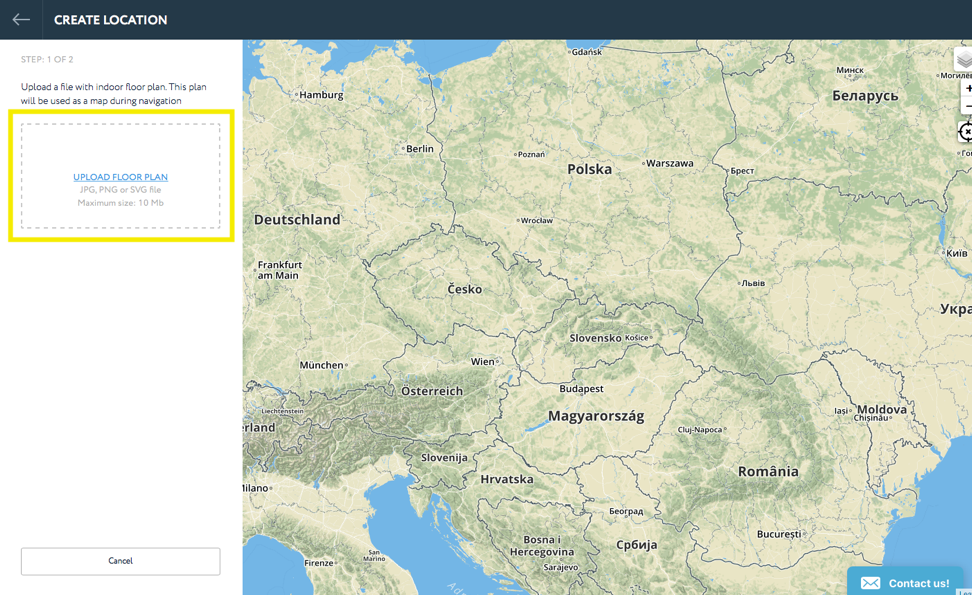
In the ADD LOCATION dialog specify the name of the location and its description. Check **Public location* if you want the Location to be available for other users.*
In the ADD SUBLOCATION dialog specify
- Title - sub-location's name of your choice
- Latitude and Longitude (optional) - corresponding to bottom left corner of the picture you added,
- Or if the latitude and longitude values are unknown, check the I don't know the latitude and longitude check box
- Azimuth angle - the angle between the North and the direction corresponding to the vertical axis of the picture you have attached. The angle is measured in degrees clockwise from the North direction. If the value is unknown, specify 0. You can edit the value later if needed.
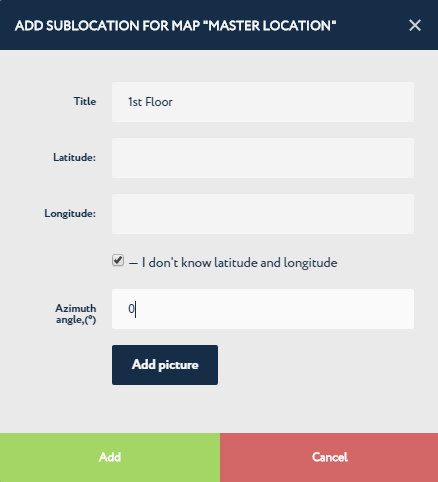
If your target location consists of more than one sub-location, you can add them into the location via the Add Sublocation functionality.
¶ Add Sub-location
Sub-locations are the actual items where you add your location's map and make the rest of manipulations like creating obstacles or specifying positions of the beacons.
To create a sub-location,
In the Locations tab, click the location's name in the list of locations, then click Add Sub-locations.
Once the ADD SUB-LOCATION dialog appears, specify the same values you have specified in the Add Location step above.
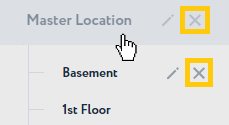
¶ Edit/Delete (Sub-)Locations
Once you have your locations and sub-locations created and find that the name is incorrect or you want to specify other values for the sub-location, use the Edit button, which appears next to the (sub-)location's name upon hovering the mouse pointer over it.

Use the Delete button if you want to completely remove a location or a sub-location with all its contents.
¶ Layers
You can choose the layers that you want to be available with the currently open sub-location. If a layer is disabled, the corresponding tool's icon turns pale and the objects that you have added to the map using the tool become invisible.
To disable/enable layers,
Activate the Layers drop-down menu,
Click the blue (gray) field next to a layer's name. Blue background means that the layer is active, gray means the layer is not active.
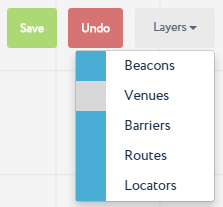
All layers are enabled by default.
¶ Add Transmitter
The Add Transmitter tool enables you to specify where transmitters are deployed in the physical location. Use it with the Trilateration algorithm approach.
To specify the physical location of a transmitter,
Activate the Add Transmitter tool.
Click map exactly in the place where the transmitter is deployed in the physical location.
In the ADD Transmitter dialog specify the iBeacons parameters:
- Description - you can add iBeacons name here.
- UUID - specify the unique name of the iBeacon
- Major - beacon major identifier
- Minor - beacon minor identifier
- RSSI per meter - measurement of the power present in a received radio signal
Click Add. The beacon's icon
should appear in the map.
Click the Save button in the top right corner to save all changes.

To roll back the changes to the last saved state, click the

button in the top right corner.
Hover over a beacon in the map to view its name. Click a beacon once to view its properties andor to delete the beacon.
¶ Add Venue

The Add Venue tool enables you to specify spots in the map like, for example, various shops or utility rooms. End user can tap a venue in the map to see information about the room, and can also use venues as target spots for navigation.
To add a venue to the map,
Activate the Add venue tool by clicking its icon in the toolbar.
Click the map exactly in the place that corresponds to the entrance to a venue (e.g. shop) in the physical location.
In the ADD VENUE dialog specify
- Title - the name of the venue
- Description EN - additional information about the venue in English
- Description RU - additional information about the venue in Russian
- Phone - venue's phone number
- X, Y - values for the current position
- Drop-down menu Category - type of the venue
- Opening hours - select day and open hours**
- Add picture button - vanue's icon
Click Add. The venue's icon
should appear in the map.
Click the Save button in the top right corner to save all changes.
To roll back the changes to the last saved state, click the
button in the top right corner.
You can configure push notifications to pop-up on a user's device upon approaching a specific venue. To do this, you will need to assign push notifications to a nearby beacon. Refer to the Configuring/Editing PUSH section for details.
¶ Add Locator

The Add locator tool enables you to specify positions of your locators.
To add a locator to the map,
Activate the Add locator tool by clicking its icon in the toolbar.
Click the map exactly in the place that corresponds to the locator's physical position.
In the ADD LOCATOR dialog specify
Name - the locator's name of your choice
UUID - the unique name of the locator
Click Add. The locator's icon in form of a blue dot should appear in the map.
Click the Save button in the top right corner to save all changes.
To roll back the changes to the last saved state, click the
button in the top right corner.
Hover over a locator's icon in the map to view its name. Click a venue once to access edit/detele mode.
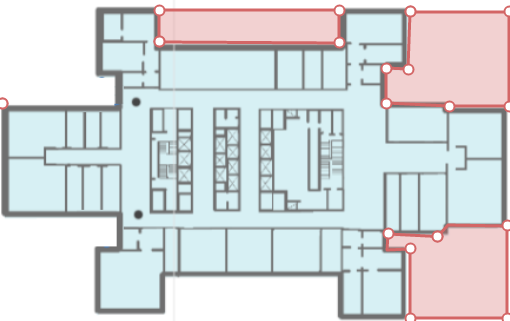
¶ Draw Barrier

The Draw barrier tool enables you to add obstacles to your location's map. Barriers are zones where a person can't get to, for example: closed rooms, areas outside of the building.
To add a barrier to your map,
Activate the Draw barrier tool by clicking its icon in the toolbar.
Demarcate the barrier borders by clicking on the map. To finish creating a barrier either click the first mark or double-click at the current position - this connects the current mark with the first one.
Once you finish adding barriers, your location should look like that:
Click the Save button in the top right corner to save all changes.
To roll back the changes to the last saved state, click the
button in the top right corner.
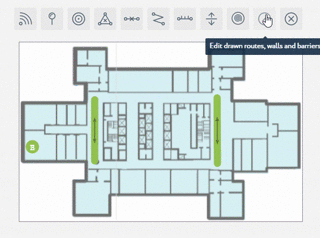
To edit a barrier use the Edit drawn routes and barriers tool.
To remove a barrier use the Erase elements on map tool.
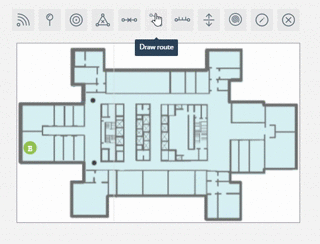
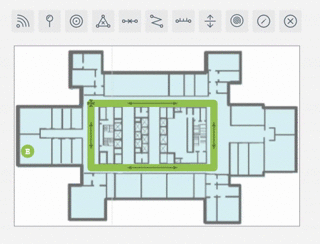
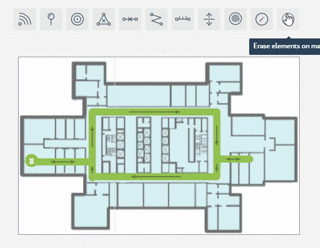
¶ Draw Route

The Draw route tool enables you to create routes - the navigation paths according to which users will navigate inside the building.
To add a route,
Activate the Draw route tool by clicking its icon in the toolbar
Click on the map to mark new vertices of the route.
To finish drawing a route, do any of the following:
- click the last added mark again
- or double-click the place where you want the route to end
- or press Enter
Click the Save button in the top right corner to save all changes.
To roll back the changes to the last saved state, click the
button in the top right corner.
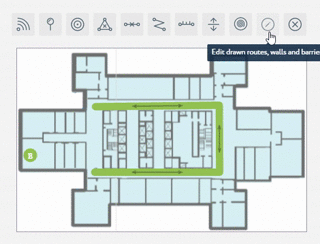
¶ Editing Routes
To edit routes, use the Edit drawn routs and barriers tool

. Once you activate the tool, drag-and-drop route parts to change the route. The tool has the following logic:
If you drag and drop an existing route point, the point coordinates will be modified and no new points will be created.
If you drag and drop a line between two existing route points, a new point will be created. The previous route line will be split into two.
Click the Save button in the top right corner to save all changes.
To roll back the changes to the last saved state, click the
button in the top right corner.
¶ Interconnecting Routes
If you create several routes in a sublocation, make sure to interconnect them.
To connect two routes, do any of the following:
Create a new route line starting on of one of the routes and ending on another.
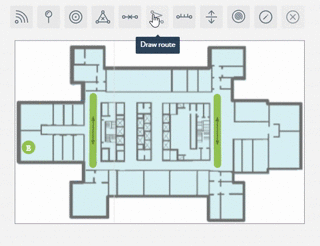
Use the Edit drawn routs and barriers tool
to drag a vertex of one route and drop it over some vertex of another route.
Click the Save button in the top right corner to save all changes.
To roll back the changes to the last saved state, click the
button in the top right corner.
¶ Editing Route Parameters
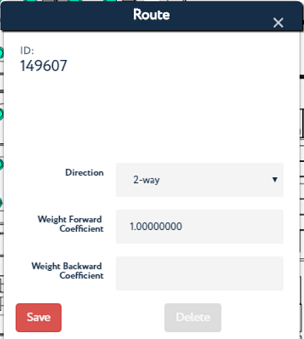
Each part of the route - a straight line between to route points - has a set of parameters that you can tune up for your needs.
To edit route parameters, release all tools (no drawing/editing tools should be active), then that part of a route, which parameters you want to modify.
You can change the following parameters:
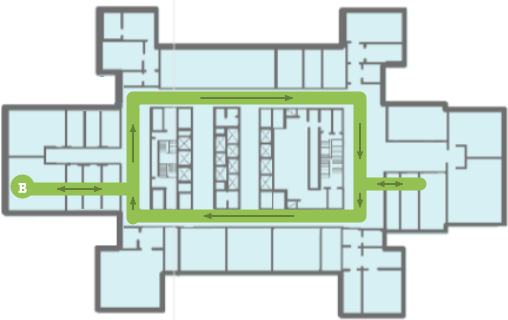
Direction - forward, backward, 2-way. By default, the routes are 2-way, which means the user can walk through the route in both directions. Use the forward/backward routes when you want to restrict users from walking through the route in some direction (forward routes starts from the point with a lesser id and finishes in the point with the greater id, and backward routes - vice versa). Below is an example of circular navigation using a combination of forward and backward routes:
- Weight Forward Coefficient - route priority among other routes while forward (from the point with lesser ID value)
- Weight Backward Coefficient - route priority among other routes while backward (to the point with lesser ID value)
Direction - forward, backward, 2-way. By default, the routes are 2-way, which means the user can walk through the route in both directions. Use the forward/backward routes when you want to restrict users from walking through the route in some direction (forward routes starts from the point with a lesser id and finishes in the point with the greater id, and backward routes - vice versa). Below is an example of circular navigation using a combination of forward and backward routes: Weight Forward/Backward Coefficients - are numbers that affect the forward/backward route "effective length". By default weight coefficients are equal to 1.0, which means that route effective length equals to its geometric length. Increase weight coefficients when you want to make some routes less attractive to the routing algorithm (the routing algorithm always chooses the route with a lesser effective length among all routes between the two points). Similarly, decrease weight coefficients when you want to make some routes more attractive to the routing algorithm (e.g. elevators can be more attractive to the users than the stairs).
Click the Save button in the top right corner to save all changes.
To roll back the changes to the last saved state, click the
button in the top right corner.
¶ Deleting Routes
You can remove parts of a route (lines between two route points).
To remove a route,
Either use the Erase elements on map tool

Once you activate the tool, click the route that you want to remove.
Or un-select any drawing/editing tools, then click route part that you want to remove, and click Delete.
Click the Save button in the top right corner to save all changes.
To roll back the changes to the last saved state, click the
button in the top right corner.
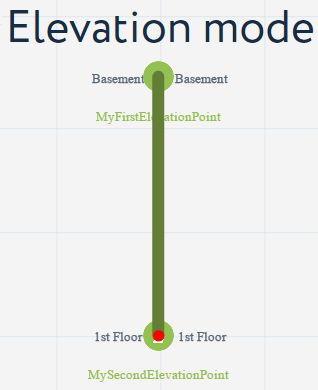
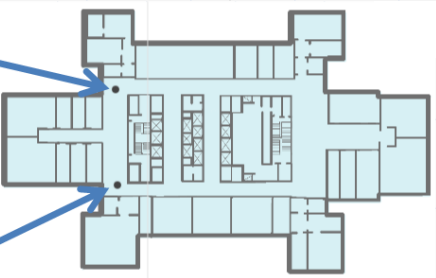
¶ Add Elevations
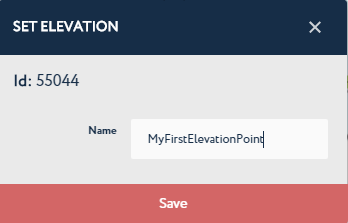
To connect routes of different sub-locations, you need to add elevation points. Consider the following guidelines:
Click the vertex that you want to make the elevation point, then enter its name in the popped-up dialog box, and click Save. Do it for at least two vertices on two separate sub-location maps.
Once you finish setting elevation points, activate the Add Elevation tool.

In the Elevation mode, click the elevation points of your choice to connect the routes they represent. To end drawing connections, double-click the last point.
Click the Save button in the top right corner to save all changes.
To roll back the changes to the last saved state, click the
button in the top right corner.
¶ Measure Current Sublocation

The Measure current sublocation tool enables you to map (or scale) the actual size of the physical location to the current sublocation map.
To measure the sub-location map,
Activate the Measure current sublocation tool by clicking its icon in the toolbar.
Now add markers - click two places on the map between which you know the physical distance. For example, two columns, like in the picture below:
In the SET LINE LENGTH specify
Width (m) - distance between two physical objects that you selected
Start - X and Y coordinates of the first mark you have just added
End - X and Y coordinates of the second mark
Click Calculate sublocation size.
Click the Save button in the top right corner to save all changes.
To roll back the changes to the last saved state, click the
button in the top right corner.
¶ Editing Tool
The Edit drawn routes and barriers tool enables you to change the objects you have created earlier.
To edit any route or barrier,
Activate the Edit drawn routes and barriers tool by clicking its icon in the toolbar.
Drag and drop the drawn object's mark to a new position.

Click the Save button in the top right corner to save all changes.
To roll back the changes to the last saved state, click the
button in the top right corner.
¶ Erase Tool
The erase tool enables you to remove any objects you have created earlier.
To remove an object
Activate the Erase elements on map tool by clicking its icon in the toolbar.
Click the object that you want to delete.
Click the Save button in the top right corner to save all changes.
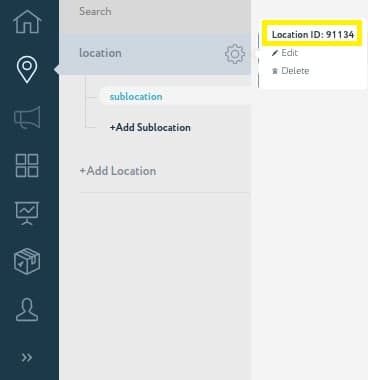
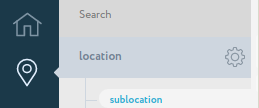
¶ Find location ID
To find location id open this page. Hover on location and click on sixtern icon
After that, you will see a pop-up window opposite the location name, where the location ID will be indicated
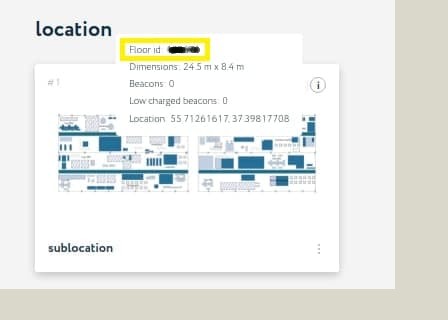
¶ Find floor (sublocation) ID
To find sublocation id open this page. Click on your location title
Find your floor (sublocation) and click on “i" icon on top right side of floor
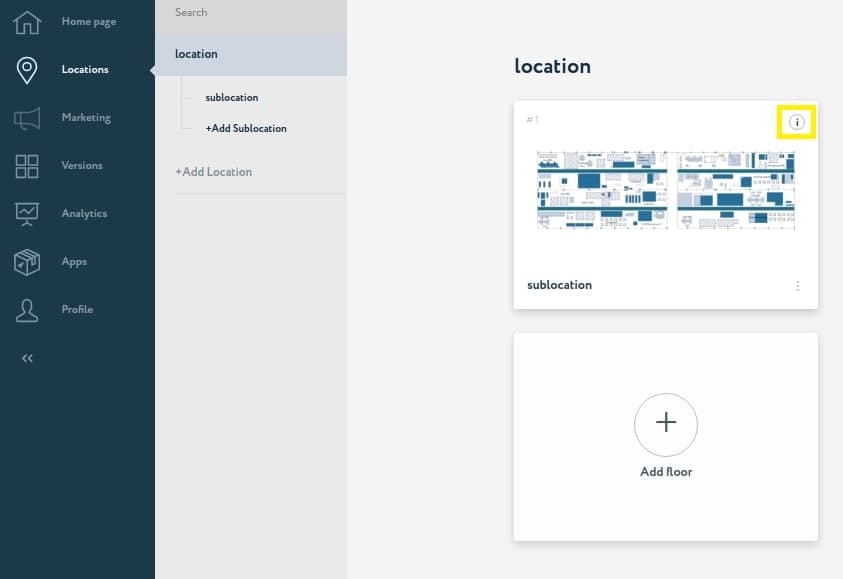
After that, you will see a pop-up window, where the floor (sublocation) ID will be indicated